Unity Tutorial 06
Week 07
Unity Tutorial 06
This week's unity work was very animation-based and had loads of new information when it comes to bringing the character to life in the game this would be really important to us when we start our game. I found the animations to be easier than I thought at it was actually really fun following along with the tutorials in this exercise.
Lesson 3.3 Don't just stand there (Animation)
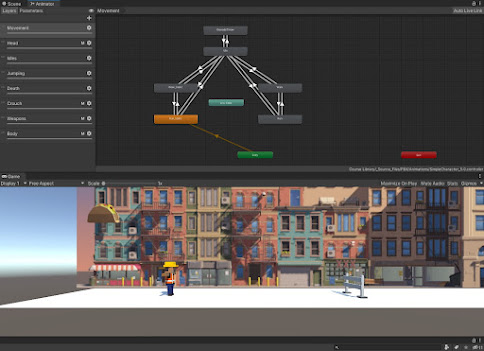
The graph above is the animation view this is where you can see all of the actions going on in this animation tree. From this tree, you could click on each of the animations and see how they work, and edit them to better fit what you're looking for in your project.

Lesson 3.4 Sound and Particle effects
We also had a second tutorial to do, this one was all about adding particle effects to the player and what they do and adding sound effects to the game, this would be adding a background track that plays on a loop and sound effects that play when the player jumps or crashes into the barrier. I think this tutorial was really engaging and will really stand to us in our projects as sounds and effects are massive when it comes to bringing a game to life, taking it to the next level or making the game that bit more immersive.

There was a console with information and a list of what's going on with the particle effect and you can make quick and easy changes to the particle with this little box.
For the trail that's left behind the player we made sure it would only be activated when the player "isOnGround" and with the explosion we set it so that it would only explode when the player collides with the barrier.
this tutorial was really insightful and I can see it being really useful when we start creating our own game this week. This tutorial also didn't take me that long it was only 2 hours and I didn't find myself messing up at all throughout it all.


Yooo Adam, this game looks sick so far. This one here is definitely one of my favourites so far. The mechanics of it look so interesting so far. The 3D character model you used looks like it fits the surrounding area perfectly and the whole game concept looks good. Keep up the good work and I hope this develops into something more. Best of luck - Luke
ReplyDelete