Posts

Showing posts with the label Unity

Unity Tutorial 9

Image
 Week 10 Unity Tutorial 09 In this week's tutorials, we learned quite a decent amount of new materials, As these weeks progress they have been getting longer and more complex, this makes sense because we have been doing this for weeks now but since they're getting harder they are taking longer to complete.  I found this week's tutorials to be very interesting and would be very valuable to use in my game project. This was the first time I've worked with UI in Unity and it's actually not as bad as I first thought. UI in games is crucial and needs to be done. We also learned how to use the GameManager Script for the first time, this was really helpful with linking a bunch of code and actions together as well as writing the code for the "Restart" and the "Game Over" texts The GameManager acts like the mind of the game and all the game objects are added to this, I feel that there needs to be a GameManager script in every project to make things clear, ...

Unity Tutorial 08

Image
Week 09 Unity Tutorial 08 This tutorial was really helpful and was a handy little test. In this tutorial, we learned how to make more enemies spawn in waves and have them slowly rise in numbers using the values "SpawnEnemyWave" this spawns another wave of enemies with an extra enemy when all the enemies from the previous round have fallen off the platform. This code is what's used to make the enemies spawn each round with an extra enemy. I also added in an if statement for the powerup too, this would make a powerup spawn every round in tandem with the enemies. This makes it a fun experience for the player because as the rounds got harder they're going to need more powerups to compete with the level of gameplay.  Something useful that I learned today was incrementing the (++) operator, this allowed for the powerup to be spawned every round when it finished, this is a very useful technique that I feel could be very important to my future projects. This factor is what ma...

Unity Tutorial 07

Image
 Week 08 Unity Tutorial 07 This week's unity tutorial was really interesting. In this tutorial, I learned how to make the middle of the screen the focal point and have the camera swivel around the player. I also learned how to move the platform and the player at the same time. Something else that was new in this tutorial was the introduction to the new bounce physics material, this was important in this exercise because it determines how far the enemy and the player get pushed when they collide with their rigid bodies.  The scene starts out with the player as the ball and you are playing on a flat pillar and the goal of the game is to stay on this pillar without getting knocked off of it, other enemy spheres are trying to knock the player off in the process.  In this tutorial, we learned how to get the ball to look and act like a ball with the bouncy material added to it by the sphere collider this way when the player hits an enemy they would bounce off each other like a ...

Unity Tutorial 06

Image
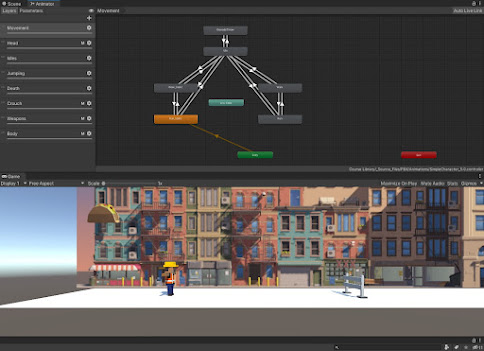
  Week 07 Unity Tutorial 06 This week's unity work was very animation-based and had loads of new information when it comes to bringing the character to life in the game this would be really important to us when we start our game. I found the animations to be easier than I thought at it was actually really fun following along with the tutorials in this exercise.  Lesson 3.3 Don't just stand there (Animation) The graph above is the animation view this is where you can see all of the actions going on in this animation tree. From this tree, you could click on each of the animations and see how they work, and edit them to better fit what you're looking for in your project. In this window, you are able to make small changes to the animation as well as preview what it looks like. In this view, it's also possible to see the conditions, from this info box you can make sure the code that you put into your script is correct. I now have a better understanding of how the components ...

Unity Tutorial 05

Image
 Week 06 Unity Tutorial 05 This week the unity tutorial was very tedious I spent so long on this week one and this was because of the number of small mistakes I made. Most of these mistakes we made through spelling mistakes and missing inputs. I think that this tutorial was really helpful in showing me how to make a background that can repeat itself, I think this would make my life a whole lot easier when making my game, since its an endless runner ill need to incorporate something like this to make the land seem like its way longer and reduce issues with rendering the lands. This task showed me that my script communication skills need a lot more improvement, If I don't work on it these tutorials and eventually my project will be long and exhausting when they should need to be.  Something that really helped me was using the console to locate the errors, usually, I don't look at it or pay any attention to it. This is something I should have started using a long time ago. The pr...

Unity Tutorial 03

Image
 Week 05 Unity Tutorial 03 After completing all the tutorials this week I can say that this was the one that I had the most trouble with. In these tutorials, we had to make a piece of land and put our characters and animals on it. We then set the boundaries of the character for moving side to side, I think this would be useful to learn because it would be something that I would need in the game I'm making. Then I took a food item as an asset added a move forward script to it. Then I learned about prefabs and turning this projectile into one so that my character could throw the food at the animals constantly without having to make so many of them. I assigned this shoot button to the spacebar in my Script, so that I could rapidly throw them at the animals as a "food fight". Since there were so many projectiles being spawned I needed to destroy them as they went off-screen so I added a line of code to state that they will destroy when they have gone a certain distance. The a...

Unity Tutorial 02

Image
 Week 04 Unity Tutorial 02 This week's task was to make the car drive around the obstacles in lesson 1.4. I found this to be the most fun in the car tutorial series. This lesson was all about making the car rotate and look like an actual car moving.  This started my making the vehicle move left and right to start with. This was done by adding "public float turnSpeed;" variable and in the void update "transform.Translate(Vector3.right * Time.deltaTime * turnSpeed); Then we went and put a new public float horizontalInput and then assign that to the get axis and see it in the inspector, this will allow you to move the car in all directions. We were now going to make it so we could control the speed by going forward and backward motion by applying the same principal but for the forwardInput and then put in the get axis in too. Although this made the car drive in all directions, the only problem we had was that the car was looking forward the whole time, so I added the ro...

Unity Tutorial 01

Image
 Week 03 Unity Tutorial 01 In this weeks list of tasks we were asked to complete the beginner lessons on unity, this was to make a car go forward and crash over obstacles on the roadway. It was called the high speed chase It was a bit overwhelming to see all the action in unity but as I watched the tutorials it helped me realize that its isn't too complicated. We started off by downloading the assets It was as simple as clicking and dragging them onto the screen. We also had to drag a car onto the road. So that we would have one obstacle one car and one road. This is where we started messing around with the x, y and z axis to see where we would like to position our vehicle and obstacles etc. So now we wanted to make the car drive forward, so we made a scripts folder inside the assets folder, from there we created a C# script. I downloaded Visual studio to code the C# for the car. We also need script for the camera to follow the car when it was moving t...